Notes
5-6 exit pipe crushing (Lui)
If you touch the side of the screen at max walking speed or more, it’s possible to clip ahead by 2 pixels and get crushed. Tap right without running from a full stop before hitting the right side, then hold right into it without risking a death.
6-10 P-Speed Fire Grabs from Big Mario (2 methods) (Kirua) src
6F3 clip (Mizumaririn) src
7-1 duck clip data src
7-1 subpixel manipulation
After you kill Lemmy (world 6 airship), there is some time before the wand grab. Position yourself under the wand and come to a stop. Tap right as briefly as possible. If Mario does not move right a pixel, keep pressing single frame inputs to the right. If Mario moves a pixel, stop and wait for wand. When Mario doesn’t move, the subpixel is incrementing higher. We want a low subpixel value though, so when he does move the single pixel, this means the subpixel is very low with only whatever remainder is left after incrementing Mario’s x position.
7-7 practice rom info (Lui) src rom patch link
HUD features: 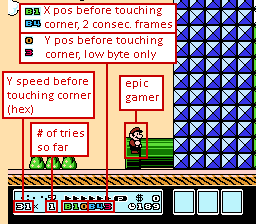
The following are some of the most commonly encountered values for the X/Y coordinates while attempting to clip
| X1 | Y1 | X2 | Y2 | description |
|---|---|---|---|---|
| AF | F/0/1 | B3 | 2/3/4 | bad lineup (-1.5 px) |
| B0 | F/0/1 | B3 | 2/3/4 | bad lineup (-1 px) |
| B0 | F/0/1 | B4 | 2/3/4 | bad lineup (-0.5 px) |
| B1 | F/0/1 | B4 | 2/3/4 | clip |
| B1 | F/0/1 | B5 | 0/1 | bad lineup (+0.5 px) |
| B2 | F/0/1 | B5 | 0/1 | bad lineup (+1 px) |
| B2 | F/0/1 | B6 | 0/1 | bad lineup (+1.5 px) |
| AD | D/E | B1 | F/0/1 | clip, positions logged a frame early |
| B1 | E | B4 | 1 | good lineup, but jumped a frame late |
Lineup is essentially luck based, so the goal is to be within 3.5 pixels off of the good X coordinates, since Mario’s max running speed is 3.5px/f.
Note that the ranges of Y positions that may work can vary:
- with a low jump (low 3x Y speed), F/0/1 on frame 1 then 2/3/4 on frame 2 should be good
- with a higher jump (high 3x up to 45 Y speed), E/F/0 on frame 1 then 2/3/4 on frame 2 should be good Low jumps are recommended of course, but avoid having under 30 Y speed near the pipe.
Also, landing on the pipe gives a position of 0, or 1 for a frame, and that’s usually logged on the 2nd frame.
7-7 zip strategy guide (Lui) src
8-2 fire sun patterns (czikubi)
Airship Rewards
- World 1 - P-wing
- World 2 - Cloud
- World 3 - Music Box
- World 4 - P-wing
- World 5 - Cloud
- World 6 - P-Wing
- World 7 - N/A
Boom Boom hammer glitch (mitchflowerpower)
Glitchy boom boom kill youtube
Boom Boom firekill, hops, and overkill (or4ng33xp0)
It’s crazy how the developers decided to program boom booms. They gave them 37 hitpoints and looked at when they hit 32 hitpoints to have the boom boom change states and turn into the orb. The boom boom is actually never “killed.” Most objects have a “killed” state, and the boom booms never use that state…they’re always in the “normal” state.
When two fireballs hit on the same frame, it takes the boom boom to 31 hitpoints, so the game never sees the 32 hitpoints. You then have to either stomp on him 3 times or hit him 31 more times to cause the upside down orb overkill.
Bowser frame hops (or4ng33xp0)
It takes 32 frames for Bowser to jump and fall back to the floor, where he spends another 16 frames before hopping again. After 5 hops, you just need the Timer3 value to not be 0 so that he’ll do another “wait 16 frames, then hop”.
5 frames for Bowser to fall to the floor after the random Timer3 value is chosen
+ (16 frames on the ground + 32 frames in the air) * 5
245 (0xF5)
So you either need 0xF5 and above or 0xF6 and above…not sure which side of the “off-by-one” error we’re on :P
That’s 11 or 12 good values out of 128 (because the random value is set to between 128 and 256), so 8.6% or 9.4%
…
6 hops = 11/128 = 8.6%
5 hops = 48/128 = 37.5%
4 hops = 48/128 = 37.5%
3 hops = 21/128 = 16.4%
Bowser routine logic (or4ng33xp0)
Mario spawns Bowser like other enemies, due to scrolling within some range. When Bowser spawns, he is in his “Wait for player” mode, waiting until the screen has scrolled all the way to the middle of the room and for the player to land on the ground before being set to “Do movements” mode. One of his timer values (Timer3) is set to 48 on this frame. Timer3 is decremented every frame.
Bowser has 4 internal states while in his “Do movements” mode:
0 - “Fall to floor”
1 - “Jump and land on floor”
2 - “Align and fall”
3 - “Bust floor and look around.”
State 3 - Bust Floor and Look Around
He starts off in the “Bust floor and look around” state while falling for the first time. He stays in this state for the 48 frames that the Timer3 value is set. When Timer3 hits 0, it is set to a random byte that is grabbed from index 4 of the random array (memory address 0x0786), and Bowser’s state is changed to “Fall to floor”. The top bit Timer3 is manually set, so the value will always be forced to between 128 and 255. In the current Any% NoWW (Warps) TAS, this random value is 248.
State 0 - Fall To Floor
In “Fall to floor”, Bowser will hop up and down, waiting 16 frames each time he hits the ground to hop again. He’ll also breath fireballs based on another random value that determines how many frames between each fireball (between 96 and 159).
When Timer3 again hits 0, the game will wait until Bowser has hit the ground (if he was in the middle of a hop) before setting a “Jump Delay” timer to 176. This timer is decremented every frame, and when it hits 128 (after 48 frames), Bowser’s internal state will be set to 1 (“Jump and land on floor”), at which point he’ll immediately do his big jump.
Knowing this, you can calculate how many frames Bowser will hang around before his first big jump based on which frame you scroll the screen to the middle and cause him to go into “Do movements” mode. But it sounds like you’ve already speed-hacked to find experimentally when the next frame is that gives you a long enough window before the first big jump to kill him before that happens.
In the TAS, the first fireball is shot when Timer3 is at 13 when Bowser is still in the “Bust floor and look around” state, and the last fireball (the “kill shot”) can be shot 2 frames after the Timer3 value hit 0 while in the “Fall to floor” state. This makes up a total of about 263 frames required before Bowser’s big jump. Depending upon where Bowser is in his hops, it appears the maximum value that Timer3 would need to be set to in order to still kill him before his first jump is 202 (hex 0xCA). This was calculated by taking 263 - 13 frames in “Bust floor” state - 48 frames of “Jump Delay” = 202.
I did some manual memory editing on the TAS, and a value of 198 (0xC6) was still good enough, due to Bowser being in the air from a little hop when Timer3 hit 0.
Buffer airships
Frame perfect normal map moves are 17 frames (often 18+ if we aren’t frame perfect), while buffered map moves are 16. At the end of worlds 4 and 6, we can carry buffered map movements to the next world.
Before we enter w4 and w6 airships, the screen scrolls. We can hold direction presses to buffered move onto the castle. Continue holding the direction and enter the airship. This keeps the buffered move bit to the enxt world.
After we beat the airship and enter the next overworld, we can hold the direction we want to go and get buffered map movements for free.
E.g. in world 4, hold left as the screen starts scrolling left. Continue holding left and press a to enter castle. Then, before mario appears on the w5 overworld map, hold up to buffered move to 5-1.
E.g. in world 6, as the screen starts scrolling right, hold right. Continue holding right and press a to enter the castle. Then, before mario appears on the w7 overworld map, hold down to buffered move to 7-1.
Early hammer (or4ng33xp0) src
Firekills
See Firekills :)
Frog% src
Game Genie Codes
KKKZSPIU YPXXLVGE AEUGNSSL
As far as I know these are the 3 best Game Genie codes to use if you want to practice on console. I don’t know exactly which code is which, but it gives you access to a world select and life counter on the opening screen, (Up/Down to change world on the left, A to add on 5 more lives) gives you a full inventory with the ability to reuse items, as well as letting you re-enter normal stages. Forts, airships, and odd levels like the pyramid are unable to be re-enter after completion, so you’ll have to suicide in the level or reset to get back into them.
| Code | Effect |
| OOKXGLIE | PUPRLE SWIMMING RACOON |
| OXKZELSX | Super speed running |
| EAYIXX | Mario will die in one hit, regardless of what form he’s in. Do not add ending spaces. |
| SLXPLOVS | Infinite lives |
| AASZAZYP | Everyone Throws Fireballs [Except Hammer Mario] |
| ZPKUVAKX | Multi Colored Levels, neat color pallet change |
| OEOZGEGT | Turns Flying Koopas Into Hammer Bros. When Stomped |
Hammer bro bonus items src
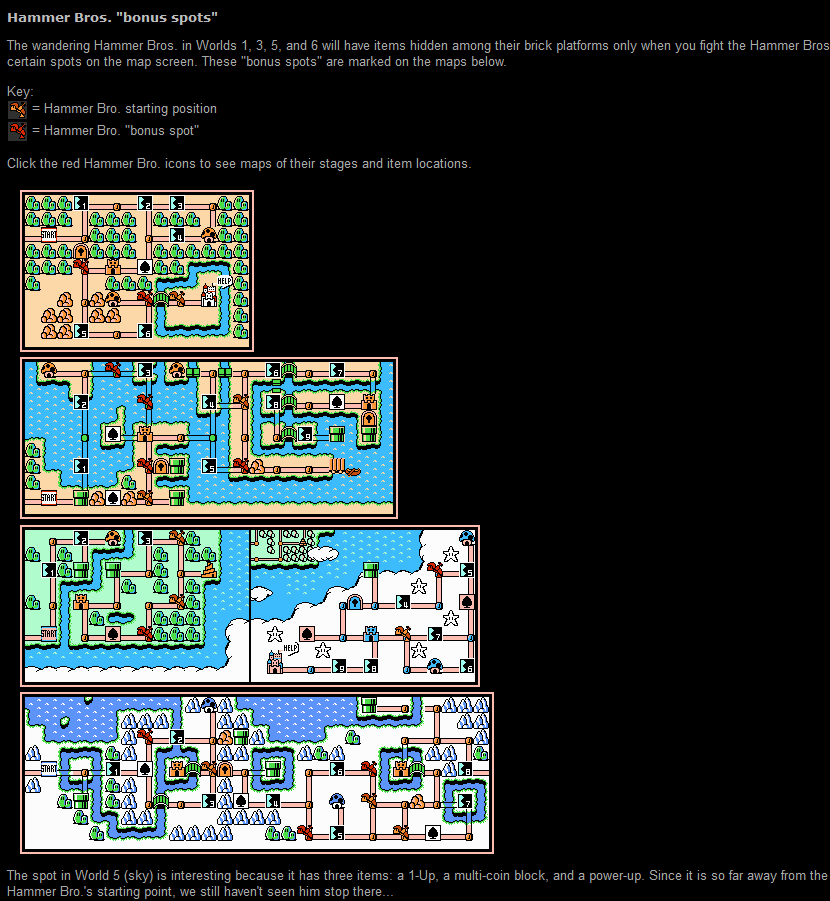
Hammer bro movement direction item (Tompa) src
After a Hammer Brother has moved, it will always face a specific direction. This way you can tell which HB that has which item.
| World | Item | Facing | # |
|---|---|---|---|
| 1 | Star | R | 1 |
| 2 | Music Box | R | 1 |
| 2 | Hammer | L | 2 |
| 2 | Flute | R | 3 |
| 3 | Star | L | |
| 3 | Hammer | R | |
| 4 | P-Wing | R | 1 |
| 4 | Star | L | 2 |
| 4 | Cloud | R | 3 |
| 5 | Star | R | 1 |
| 5 | Music Box | L | 2 |
| 5 | P-Wing | R | 3 |
| 6 | Hammer | R | 1 |
| 6 | Cloud | L | 2 |
| 6 | Star | R | 3 |
Hitboxes src
Level Durations gdrive SMB3 Times
maps nesmaps
N-Spade card game
There are 8 solutions to the nspade card game, shown below.

A runner can invest some time identifying the solution then getting two fire flowers. The first fire flower can be used after 5-1. This allows for fire kill in 5-F1. This second fire flower can be used after wall-jumping 6-9. This allows for 6f3 zip, faster 6f3 door entry, boom boom firekill, and 7-2 fast pspeed.
See felo’s card strat for details and route.
N-spade warpless route
See N-spade warpless route :)
Offscreen wand grab offset script (lui)
Reset to clear ram (e.g. wrong warp) (kabaudio)
Do you have to hard reset/power off for several seconds to get wrong warp? What normally temporal values stick around in reset?
If playing on original console, certain crashes can actually fill the stack (Ram $0100 -> $01FF) with garbage values. Because this particular part of ram is NEVER cleared by the game’s reset logic (only the stack pointer is initialised to FF), nor any ram clear routines (they always leave the stack), it means that if you get a crash that does change the stack ram, you can end up being spat out of the glitched pipe the wrong direction, because it actually reads part of the stack as tile data for the glitch pipe as Mario travels down it.
Certain values tell the pipe logic to change direction like left, right, up down etc (only on vertical pipe maze levels which have bendy pipes)
So if your unlucky, you might be on a PB paced run, go down the pipe, and be spat back out the top.
Since resetting on console doesn’t help clear the stack, the easiest way to do so is to power off for a few seconds, then power back on, as this allows the Ram values to decay from lack of power, and thankfully the power on state appears to be in a way that doesn’t affect the pipe glitch (but no one knows what it actually starts on - as its uninitialised)
This is never a problem on emulator, as emulators generally fill all ram at power on / reset with | $0000 | 0 0 0 0 F F F F 0 0 0 0 F F F F | | $0010 | 0 0 0 0 F F F F 0 0 0 0 F F F F | | etc | etc |
You only really need to do a hard power off and on sequence after a crash.
Examples on console:
Zikubi doing all forts wrong warp, clip here:
His old console actually had a very finicky ram chip that would even hold bad values after power off and on. We found an ice pack to lower the temperature of the ram chip helped (power on ram states can be affected by temperature)
Also happened to Kirua, clip here
I assume you’ll be attempting the shell throw setup next so prepare for plenty of crashes :wink: If you need any other info feel free to DM me.
Route Comparison (Lui) src
Simulated w2 RNG (lui) src
| post 2-3 eh | 1.8% |
| 1 death eh | 0.51% |
| 0 death eh | 0.05% |
Simulated w3 RNG (lui) src
simulated w3 rng 1 million times up to before clouding 3-6 and this is what i got:
| description | matches | rate |
| no runaway | 727457 | 72.75% |
| runaway with at least 1 death required | 247399 | 24.74% |
| hammer runaway and star is skippable | 1014 | 0.10% |
| runaway and both bros are skippable | 15274 | 1.53% |
| runaway and both bros are skippable but optional comeback is possible (subset of the above) | 9322 | 0.93% |
| runaway with unskippable star unless hammer is fought | 8499 | 0.85% |
| runaway with unskippable star and hammer right of 3-6 | 211 | 0.02% |
| runaway with unskippable star and hammer right of 3-8 | 146 | 0.01% |
Simulated w6 RNG (lui) src
61.4% chance of skipping star bro
warpless, over 1 million simulations, runs with at least a movement of x+:
- 4+: 39.9%
- 5+: 20.3%
- 6+: 11.8%
- 7+: 8.1%
- 8+: 7.3%
- 9+: 5.4%
SMB3 RTA Wiki
Slightly outdated, but still has some decent information. I might look into getting this more up-to-date as the days go on.
TAS notes
Frame windows, speeds, and things involving information derived from or useful to TAS’ especially is here
Votes
See votes for details.
Zip/clip windows (mfp)
Looking for feedback: the window for 7-1 standing appears much smaller than 7-6 standing?
| Level | Frames | Notes |
| 6-9 | 0-5 | small mario, 2 frame window |
| 7-1 | 14-15 | standing clip |
| 7-1 | 0-6 | duck clip |
| 7-6 | 3-10 | standing clip |