Warpless Route Guide (Cujo)
(Copied from src)
I’ve noticed that people who want to learn warpless have several resources to learn strats for all the levels, but nothing to learn the overworld route connecting all those levels. The route can appear somewhat byzantine to a lot of beginners, so this doc is written to explain the choices made in the route most SMB3 runners use for warpless.
This doc will highlight the warpless route used by the vast majority of SMB3 runners. Other routes do exist and may be somewhat faster, but they generally also entail a much greater degree of risk in execution or RNG. Like with any other speedgame, it’s up to you to decide what to sacrifice in order to have a faster or more consistent run. This route is merely a baseline.
If using an inventory item on a certain stage will save an enormous amount of time over any other possible choice, I will list it directly in the level order. Most other common item use cases will be described in the notes for each world. These items are generally up to your personal preference, but I will point out the fastest set of hammer bros to kill and the fastest places to use their items in the conventional route. Obviously, if you choose to use more items, you’ll have to kill more hammer bros to get those items.
General Advice
- With one possible exception (which I’ll point out later), don’t ever visit mushroom houses. If you lose a powerup, it’s always faster to regain that powerup in stride using good backup strats, than to wait half an eternity for Toad to stop talking in hopes that you’ll get the flower you need instead of the leaf you don’t need.
- Don’t ever visit spades. If you’re so low on lives that you need to play a minigame to get more of them, consider resetting.
- As of this writing, no one has found a way to save time overall by getting extra items from the card matching game. Until that happens, don’t ever play the card matching game. Same reason as mushroom houses.
- If a hammer bro (HB) is located at a spot where the map screen transitions from one area to another, you can skip that HB by moving to that spot then holding whichever direction you want to go during the transition.
- Don’t trigger coin ships. If you finish a level in World 1, 3, 5, or 6 with a coin total that’s a multiple of 11 and the 10’s digit of your score being the same as the digits in your coin total, one of the remaining HBs will transform into a coin ship, and it can only change back if you die on that coin ship.
- Correct your coin total to a multiple of 11 plus 1 (12, 23, etc.) when appropriate.
- Each tick left on the clock at the end of each level/fort adds 50 to your score, so if ending a level at the wrong moment might trigger a coin ship, stop and wait to finish the level until the clock is right.
- If you do trigger a coin ship, try to avoid it if the item it carries isn’t absolutely necessary. If it is absolutely necessary, kill yourself on the coin ship as quickly as possible or reset.
Hammer Bro Mechanics
Hammer bro overworld movement mechanics follow just a few simple rules:
- HB movements occur each time you die, complete a level/fort (other than 5-Tower), or kill another HB. They do not occur at the beginning of worlds, on the turn after you use a music box, or after pipes, mushroom houses, or spade games.
- A moving HB will move one space at a time until it lands on an empty space.
- HBs can move to but not stop on mushroom houses, unfinished levels/forts (other than 5-Tower), and castles.
- HBs cannot move through rocks or locks, nor to pipes, spades, finished levels/forts, or 5-Tower.
- HBs can move through unpassable bridges in World 3.
- An HB will never follow one path then immediately backtrack over the same path on the same turn, unless it goes to a dead end where it can’t stop and is forced to backtrack (e.g., a mushroom house with only one path to/from it).
- If an HB is surrounded by spaces that it cannot move to, it will simply not move.
- If an HB moves to a space occupied by another HB (moving or stopped), both HBs will move away from that space. This leads to a marathon if both HBs move away in the same direction.
Not all HB movements have equal probability. If you want to know the actual probability of specific, individual movements, ask a TASer.
- If you learn these rules and the map layout of each world, you can learn to reliably track the HBs, sometimes even when they’re off-screen. This ability can be extremely valuable in situations where you want to kill one HB while avoiding another.
The Route
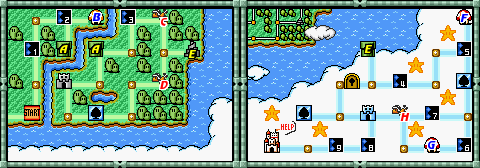
World 1
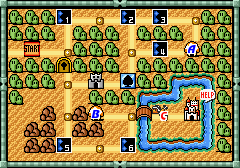
C - star
Level order: 1-1 → 1-2 → 1-F → 1-5 → 1-6 → Castle 1
Notes: W1 is totally straightforward. It’s impossible to skip the HB without beating 1-F the slow way and dying at least 2 times, so don’t bother.
After beating W1, the princess gives you a P-wing.
World 2
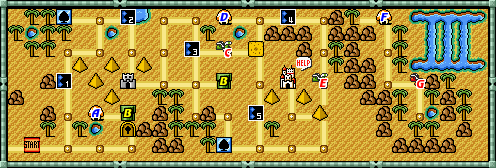
C - music box
E - hammer
Normal level order: 2-1 → 2-2 → 2-F → 2-3 → 2-Sun → 2-4 or 2-5 → 2-Pyramid → Castle 2
Early hammer level order: 2-1 → 2-2 → 2-F → suicide in 2-3 if grinding EH → 2-Pyramid → Castle 2
Notes: The music box HB should be avoided if possible; otherwise hope for good RNG in W5.
2-4 is slightly faster than 2-5, but it’s also slightly more dangerous. Go to 2-5 if that’s your best chance of getting the hammer and not the music box. Go to 2-4 otherwise, if you’re comfortable with it.
If you make a mistake before 2-3, consider grinding for early hammer (EH) before resetting. When grinding for EH, kill yourself either in 2-3 or against the music box HB, whichever is closer. If the music box HB moves below 2-3, you can kill it then move to the pipe on the right (without entering it) to see where the hammer HB is, costing only a few seconds.
Deathless EH after 2-3 is still significantly faster than the normal route, so use the hammer in W2 if you can, even if you only skip 2 levels in the process.
A map transition point exists between 2-3 and 2-Sun.
After beating W2, the princess gives you a cloud.
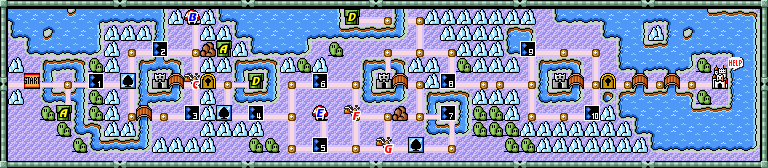
World 3
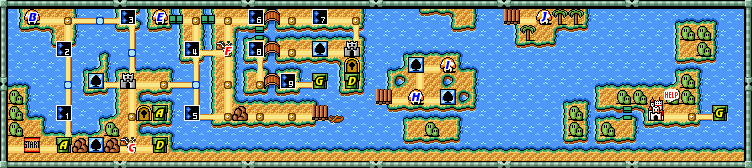
C - hammer
F - star
Level order: 3-1 → 3-2 → 3-3 → 3-F1 → 3-4 → cloud past 3-6 → 3-8 → 3-9 → pipe → Castle 3
Notes: If you die an even number of times in W3, you should kill both HBs before 3-6. Otherwise, the bridge from 3-6 to 3-8 will be unpassable. If one HB runs away, kill yourself in 3-6 then cloud past it. If both HBs run away, cloud past 3-6 then hope that you can kill only the hammer HB after 3-8 for a rare time gain.
If you die an odd number of times in W3, kill the hammer HB and avoid the star HB.
Map transition points exist to the right of 3-4 and north of the 1st transition point.
After beating W3, the princess gives you a music box.
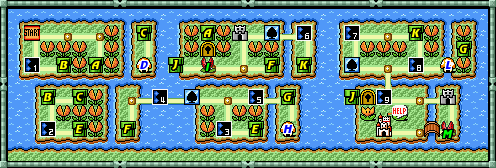
World 4
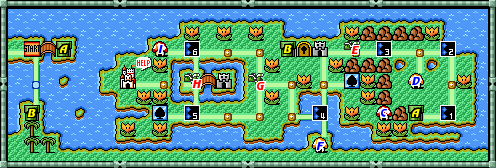
E - cloud
G - star
H - P-wing
Normal level order: upper pipe → 4-1 → 4-2 → 4-3 → hammer past 4-F1 → 4-4 → 4-6 → 4-F2 → Castle 4
Early hammer level order: upper pipe → 4-1 → 4-2 → 4-3 → 4-F1 → 4-4 → 4-6 → 4-F2 → Castle 4
Notes: Always kill the cloud HB. Between W4 and W5, you want to get 1 P-wing and 0 stars. You’re more likely to skip the star HB in W5, so unless you can guarantee that you will only get the P-wing HB and not the star HB here in W4, you should use a music box after 4-4 to skip both HBs.
Occasionally, the W4 HBs will move such that you can get to 4-6, 4-F2, or even Castle 4 without using a music box. In this case, hold off on using the music box until it’s absolutely necessary.
On the other hand, sometimes one of the other HBs will switch places with the cloud HB. In this case, don’t use a music box at any point in W4. Kill the switching HB and the cloud HB, and try to avoid the 3rd HB, but kill the 3rd HB too if it gets in your way.
Some runners choose to use a star in 4-3, 4-F1, and/or 4-6 for safety.
Map transition points exist west of 4-4 and 2 spaces west of 4-F2.
After beating W4, the princess gives you a P-wing.
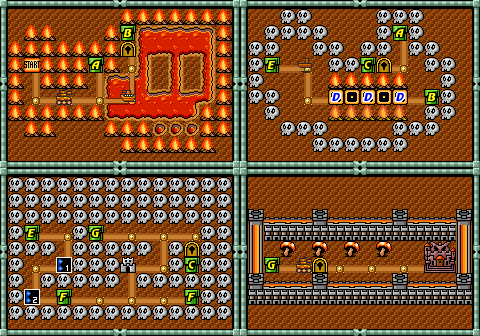
World 5
C - star
D - P-wing
H - music box
Level order: 5-1 → 5-2 → pipe → 5-F1 → 5-Tower → 5-4 → 5-5 → 5-7 → 5-F2 → 5-8 → cloud past 5-9 → Castle 5
Notes: If you didn’t get a P-wing from the HB in W4, get one from the HB here in W5.
If you didn’t use a music box in W4, you can use it after 5-F1 to either skip both ground HBs (if you got the P-wing in W4) or just the star HB (if you didn’t). If you have your P-wing and can skip the star HB without the music box, save it.
If you have a music box from the HB in W2 or from not using one in W4 and W5, try to avoid the music box HB here in W5, killing it if you’re forced to. If you don’t have a music box, kill the music box HB.
Some runners choose to use a star in 5-Tower for safety.
After beating W5, the princess gives you a cloud. �
World 6
C - hammer
F - cloud
G - star
Level order: pipe → hammer to 6-F1 → 6-4 → P-wing into 6-5 → hammer past 6-7 → 6-F2 → 6-8 → P-wing over 6-9 → 6-F3 → Castle 6
Notes: Always kill the hammer HB, since you’re forced to. If you have an extra music box, use it immediately after killing the hammer HB (before moving to 6-F1) to make tracking the other HBs easier.
Always kill the cloud HB, but try to avoid the star HB.
Some runners enter the mushroom house above 6-5 to get a hammer suit, which will eventually be used in Bowser’s Castle. This is significantly slower overall, but it makes the Bowser fight extremely easy.
You can skip the interior of 6-9 without a P-wing by doing a wall jump, but this is a last-resort strat for when you’re short a P-wing for whatever reason. If you have the right number of P-wings, use one to fly over 6-9. If you’re short a P-wing and are not comfortable with the wall jump, do 6-10 instead or zip through 7-6 after using the P-wing in 6-9.
Some runners choose to use a star in 6-8 for safety and a very small time gain.
A map transition point exists east of 6-5.
After beating W6, the princess gives you a P-wing.
World 7
Level order: 7-1 → pipe → 7-2 → pipe → 7-3 → cloud past 7-4 → pipe → P-wing through 7-F1 → P-wing over 7-6 → pipe → 7-8 → 7-9 or 7-F2 (cloud one, play the other) → music box past 7-Piranha2 → Castle 7
Notes: Most runners use a star in 7-2, but some use a P-wing or grab the backup flower near the beginning instead.
If you only have 1 P-wing going into 7-F1, use it in 7-F1, lose it intentionally against the Boom Boom, then zip through 7-6.
Most runners use a star in 7-8, but if you have a tail going into it, the star is unnecessary and slightly slower overall but still far safer.
Theoretically, the fastest choice between 7-9 and 7-F2 is to successfully complete all 4 zips in 7-9 in 8 total tries or fewer. Short of that, 7-F2 is faster but more risky, so some novice runners choose to do 7-9 without zips.
After beating W7, Bowser pulls a switcheroo and steals whatever the princess tried to give you.
World 8
Level order: Tanks → Navy → pipe → Hands → Air Force → pipe → 8-1 → 8-2 → 8-F → left pipe → Super Tanks → Bowser’s Castle
Notes: The boomerang bro at the end of Tanks gives you a star.
Don’t get hands.
If you get hands, each one will give you a leaf once you beat it.
Some runners use a P-wing to fly over 8-1 and/or 8-2.
Most runners use a star in 8-F for safety.
If you got a hammer suit from the mushroom house in W6, use it in Bowser’s Castle to make the Bowser fight trivial.